tmux: reload bash config across all panes and sessions

Yesterday I got myself into tmux and I love it!

tmux is a terminal multiplexer. It lets you switch easily between several programs in one terminal, detach them (they keep running in the background) and reattach them to a different terminal.

I’ve been using Zellij for several months prior to this. Which I must thank for getting me introduced to the world of terminal multiplexers. However I’ve been running into several issues with it, that got me looking for an alternative:

  • Session manager entires keep shifting and popping in and out randomly. This is the most frustrating thing, probably number one cause for me to look for a change.
  • Occasional crashes during session switching.
  • No ability to toggle between last two used sessions.
  • No number hotkey assignment for tabs.
  • Need to match Zellij theme with your terminal theme. They are two separate things.

The switch

A fantastic start into tmux are these two videos from typecraft over at YouTube. The basics are wonderfully explained there as well as some key configuration. This got me going immediately.

Here’s a documented .tmux.conf a arrived at after a day or two:

# Settings

# Change leader key to something more ergonomic
# Note: On MacOS disable the shortcut to change keyboard input language first in Settings.
set -g prefix C-Space
# Allow mouse interactions like focusing windows and panes and resizing
set -g mouse on
# Simplify the status bar look: white text on black background
set -g status-style bg=black,fg=white
# Disable hostname, date and time display in the status bar
set -g status-right ""
set -g status-position top
# Use vim style navigation
set -g mode-keys vi
# Number windows starting from 1, instead of 0
set -g base-index 1
# When window is closed, refresh the numbering
set -g renumber-windows on
# Change the look of session name in the status bar
set -g status-left "#[fg=blue]#S#[default] #[dim]→#[default] "
# Do not truncate session names too early
set -g status-left-length 100

# Keybindings

# Shortcut for live reload of tmux config
unbind r
bind r source-file ~/.tmux.conf

# Last session toggle
bind S switch-client -l

# Maximize pane
bind z resize-pane -Z

# vim like pane navigation
bind h select-pane -L
bind j select-pane -D
bind k select-pane -U
bind l select-pane -R

# Set new windows and panes in the current directory
bind c new-window -c "#{pane_current_path}"
bind '"' split-window -c "#{pane_current_path}"
bind % split-window -h -c "#{pane_current_path}"

Superpowers: issuing commands to all panes in all sessions

I almost forgot what I wanted to write about initially. So here’s a ready made alias I use to reload bash config across all my tmux bash sessions. This is sooo useful when I for example add something like a new alias in my .bashrc. Previously I’d have to manually source the config in each pane where I’d want to use the alias, which is a pain. Now it’s just one command:

alias reload-bash-config-in-bash-panes=$'tmux list-panes -a -F \'#{session_name}:#{window_index}.#{pane_index} #{pane_current_command}\' | awk \'$2 == "bash" {print $1}\' | xargs -I{} tmux send-keys -t {} "source ~/.bashrc" C-m'

This ensures the source command is only executed in panes that are running “bash”. It won’t affect your neovim instances for example, or other programs where it could cause unintended consequences.

Layouts: GitOps for workspaces

In Zellij, layouts are build in and a wonderful feature. In tmux land, there is tmuxinator–a separate program–that handles layout definition via YAML files and starting sessions based on those layouts. It’s simple and I got going with it immediately.

Here’s a layout I use to run this blog in development environment:

name: klevo
root: ~/projects/klevo

windows:
  - edit:
      layout: main-vertical
      panes:
        - #bash
        - nvim
  - server:
      layout: even-horizontal
      panes:
        - docker compose up
        - ruby -rwebrick -e'WEBrick::HTTPServer.new(:Port => 8083, :DocumentRoot => ("#{Dir.pwd}/_site")).start'

tmux and neovim are the two things I wish I learned much earlier in my career. Mastering these tools provided an immense ergonomic boost to my workflows. It’s a joy to fly through projects and tasks in a fast, consistent, repeatable and simple environment, exactly suited to my needs.
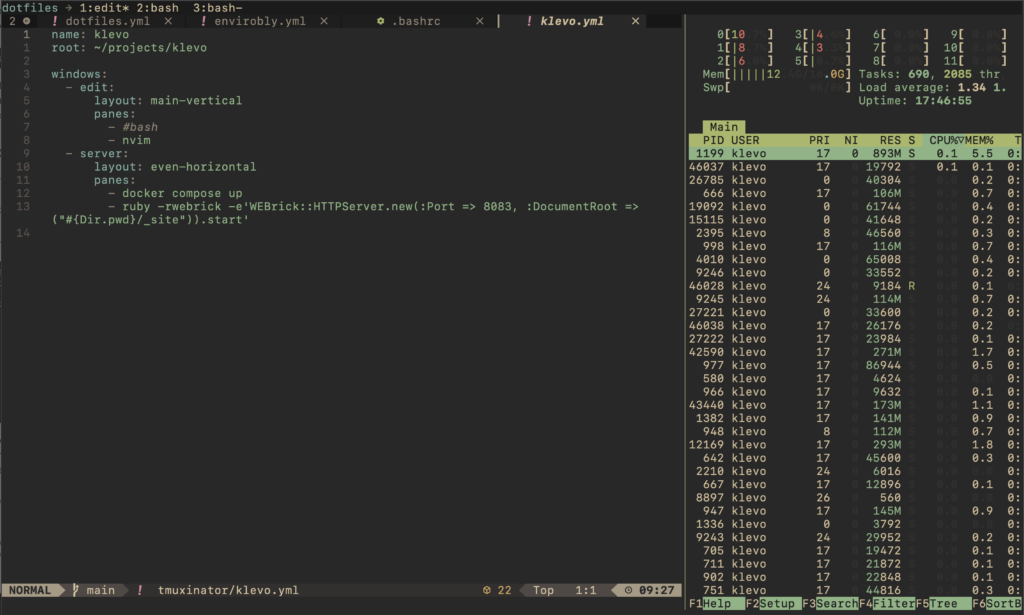
My current tmux configuration running inside Ghostty terminal.

Enable IPv6 connectivity to and from containers deployed with Kamal

At the moment, Kamal doesn’t support IPv6 out of the box. Meaning your containers won’t be able to reach IPv6 hosts at all. IPv6 support is expanding, and on some of my projects, I need such connectivity. Taking Kamal for a ride, I’ve run into this issue and had to solve it.

I’ll show you how to do this, both with an already deployed app, as well as if you haven’t run “kamal setup” just yet.

Already deployed app

There will be a short downtime (couple of seconds) while you do the switch. So plan for that.

All we need to do is to recreate the kamal Docker network, which is created with IPv4 support only, by Kamal. The problem is, you can’t remove a Docker network if containers are attached to it.

Here’s a script that reconnects the containers to a temporary network, recreates kamal network with IPv6 support, connects the containers back to it and cleans up. During this, there will be a few seconds of a downtime, as your containers will briefly loose connection to the network and/or between each other.

#!/usr/bin/env bash
set -euo pipefail

OLD_NET="kamal"
TEMP_NET="kamal_tmp_v6"

echo "Collecting containers connected to network '$OLD_NET'..."
CONTAINERS=$(docker network inspect "$OLD_NET" -f '{{range .Containers}}{{.Name}} {{end}}')

if [ -z "$CONTAINERS" ]; then
  echo "No containers found on network '$OLD_NET'."
  exit 1
fi

echo "Creating temporary IPv6-enabled network '$TEMP_NET'..."
docker network create \
  --ipv6 \
  "$TEMP_NET"

echo "Connecting containers to temporary network..."
for c in $CONTAINERS; do
  echo " → Connecting $c to $TEMP_NET"
  docker network connect "$TEMP_NET" "$c"
done

echo "Disconnecting containers from old network '$OLD_NET'..."
for c in $CONTAINERS; do
  echo " → Disconnecting $c from $OLD_NET"
  docker network disconnect "$OLD_NET" "$c" || true
done

echo "Removing old network '$OLD_NET'..."
docker network rm "$OLD_NET"

echo "Recreating network '$OLD_NET' with IPv6 enabled..."
docker network create \
  --ipv6 \
  "$OLD_NET"

echo "Reconnecting containers to new '$OLD_NET'..."
for c in $CONTAINERS; do
  echo " → Connecting $c to $OLD_NET"
  docker network connect "$OLD_NET" "$c"
  echo " → Disconnecting $c from $TEMP_NET"
  docker network disconnect "$TEMP_NET" "$c" || true
done

echo "Cleaning up temporary network '$TEMP_NET'..."
docker network rm "$TEMP_NET"

echo "✅ IPv6 successfully enabled on '$OLD_NET' and containers reattached."

Copy it anywhere on your server, for example ~/enable_ipv6_on_kamal.sh, make it executable and run it:

chmod +x enable_ipv6_on_kamal.sh

# Run it
./enable_ipv6_on_kamal.sh

You’re done. After a few seconds you should be able to access your app, as kamal-proxy succeeds with it’s health checks.

Before your first deployment

This is easier. On the host, just create the Docker network Kamal expects manually, and Kamal will use that once you start deploying.

docker network create --ipv6 kamal 

That’s all! Now you can run kamal setup from your developer machine and you’ll have IPv6 connectivity from and to your containers right away.

Enabling initramfs on AWS EC2

Modern EC2 instances on AWS boot without invoking initramfs by default. So if you want to do things like repartition your disk, where the root partition is, you’ll be scratching your head why your initramfs hooks aren’t loading.

After an hour or two of debugging, I figured out an easy way to enable it. This is tested on Ubuntu 24.04 LTS:

sudo rm /etc/default/grub.d/40-force-partuuid.cfg
sudo update-grub
sudo grub-mkconfig -o /boot/grub/grub.cfg

# On the next reboot initramfs will run
sudo reboot

Enjoy.

tinyups3 – streaming S3 uploader

Working with the official AWS S3 CLI, as well tools like s5cmd I quickly realized they aren’t optimized for resource constrained systems, rather more towards uploading as fast as possible and in parallel. This is great for most use cases, but not when you want to minimize the impact on the system, like during frequent backup operations and on a system with half a gig of memory for example.

I dusted off my Go tools and build a simple tool to serve this purpose. Say hello to tinyups3 – streaming S3 uploader optimized for minimum CPU and RAM usage. It’s a single binary, open sourced under the MIT license.

Head over to GitHub for installation and usage instructions.

Happy uploading!

curl request and return headers only

The UNIX command line tools is something that just keeps giving. Within web development I often find myself wanting to quickly debug a URL, see whether it’s alive or what the response is. Often I do not want to download the whole content (a large file for example). Before I learned the following, I would use Chromes Developer Tools. That is until I learned how to do it more efficiently and quicker with good old curl:

curl -I 

Which returns something like:

HTTP/1.1 200 OK
Server: cloudflare-nginx
Date: Sat, 27 Jun 2015 17:27:17 GMT
Content-Type: text/html; charset=UTF-8
Connection: keep-alive

It’s especially handy when setting up and testing temporary or permanent HTTP redirects. Doing that in a browser can be cumbersome due to caching.

Faster SSH workflow with multiplexing

I was reading The Art of Command Line (great stuff) and tried the SSH configuration tips. With the below config I noticed considerable speedup in various SSH and Git related workflows. My ~/.ssh/config now includes:

Host *
  TCPKeepAlive=yes
  ServerAliveInterval=15
  ServerAliveCountMax=6
  Compression=yes
  ControlMaster auto
  ControlPath /tmp/%r@%h:%p
  ControlPersist yes

Speed improvements I noticed:

  • I push my code to the remote often. Thanks to the keep alive options, the connection is kept open and subsequent pushes do not incur the penalty of establishing a new connections.
  • The same applies to server provisioning and maintenance. Once the initial connection is established, it is kept alive and sessions opened in new terminal tab or window begin instantly.

More on this topic with in depth explanations:

Speeding up bundle install with in-memory file system

On some of the servers I work with, due to cheap hard drives in software RAID configuration, I’ve found that bundle install can be extremely slow (take half an hour to complete). This obviously became unacceptable during deploys.

I thought that it might have something to do with how bundler writes a lot of small files during the installation of the gems. So I decided to try putting the deploy bundle directory (where all the gems are being installed) onto the in-memory filesystem. On Ubuntu this is /dev/shm.

It works flawlessly. The install time improved from half an hour down to a few seconds. After the bundle install is complete however, we do not want to leave the installed gems in the memory, as during restart they would be purged. So we just copy the directory back to the disk. Strangely enough, copying the whole directory from /dev/shm does not trash the disk so much and it only takes up to a minute for a few hundred MB of gems.

It’s cool to be able to find and utilize such a useful and simple part of Linux to solve and work around a slow hardware problem, while for everything else the server does, it’s still perfectly usable and more than capable of performing it.

Here’s my Capistrano 3 lib I use in my deploys that integrates this speedup:

namespace :bundler_speedup do
  task :symlink_to_shm do
    on roles(:all) do
      bundle_shm_path = fetch(:bundle_shm_path)
    
      # Make sure bundle dir exists
      execute "if [ ! -d #{shared_path}/bundle ]; then mkdir #{shared_path}/bundle; fi" 

      # todo: what if #{shared_path}/bundle is a symlink - meaning an interrupted install from previous time?

      cmds = []
      # Copy the bundle dir to /dev/shm/
      cmds << "cp -r #{shared_path}/bundle #{bundle_shm_path}"
      # Remove the shared bundle dir and symlink the shm dir instead
      cmds << "mv #{shared_path}/bundle #{shared_path}/bundle.old"
      cmds << "ln -s #{bundle_shm_path} #{shared_path}/bundle"
      # We're ready to do a fast in-memory bundle install now...
      execute cmds.join(' && ')
      
      info "shared/bundle was copied to /dev/shm for in-memory bundle install"
    end
  end

  task :remove_from_shm do
    on roles(:all) do
      bundle_shm_path = fetch(:bundle_shm_path)
      cmds = []
      # Copy the shm bundle to shared
      cmds << "cp -r #{bundle_shm_path} #{shared_path}/bundle.new"
      # Remove the symlink and move in the dir on disk
      cmds << "rm #{shared_path}/bundle"
      cmds << "mv #{shared_path}/bundle.new #{shared_path}/bundle"
      # Remove the in memory bundle
      cmds << "rm -rf #{bundle_shm_path}"
      cmds << "rm -rf #{shared_path}/bundle.old"
      # Bundle is persisted and in place
      execute cmds.join(' && ')
      
      info "shared/bundle was restored from bundle install within /dev/shm"
    end
  end
  
  before 'bundler:install', 'bundler_speedup:symlink_to_shm'
  after 'bundler:install', 'bundler_speedup:remove_from_shm'
end

namespace :load do
  task :defaults do
    set :bundle_shm_path, -> { "/dev/shm/#{fetch(:application).gsub(' ', '_').downcase}_bundle" }
  end
end

In a Rails project, place it in lib/capistrano/tasks/bundler_speedup.rake. Capistrano should auto-load this for you.

This code is released under the MIT license.

Some useful command line tools

It’s about time I got myself familiar with some of the core UNIX command line tools. No matter how good the GUI applications look like and work, when using command line alternatives the stuff gets done faster and it’s less prone to error.

I am talking here especially about FTPing stuff around. I’ve using Cyberduck so far but there were some bugs in the recent release and I’ve also read about the comparison of speed vs command line tools. It’s slower.

So I’ve learned to use rsync and lftp. It’s pure awesomeness. I can’t imagine going back to dragging files around in the GUI.

Also I’ve learned some basic Vim usage. It’s the fastest way to do quick .htaccess edits, or turning on/off CakePHP debug mode on the server and similar stuff. I realize some programmers use it full time for their work, but to go there Textmate shouldn’t have to exist.